 迷ったさん
迷ったさんPythonとGA4を連携したら、楽できそうー!
この記事では、Google Analytics APIを使って、PythonでGoogle Analytics 4(以下:GA4)にアクセスする方法をお伝えしていきます。
PythonとGA4を連携することで、面倒なデータ収集やレポート作成を自動化することも可能です。
- Google Analytics APIの取得方法
- PythonとGA4の連携方法
- GA4のレポートの取得方法
最初に注意点ですが、今回は、GA4のレポーティングを扱います。
それ以前のバージョン(ユニバーサルと呼ばれるGA3のこと)は方法が異なるのでご注意ください。
環境
| OS | Mac 10.15.4 |
| Python | python 3.9 |
| 仮想環境 | Poetry |
| Homebrew | 8.0.19 Homebrew |
Google Cloud Platform のプロジェクト作成
今回は、Google API Platformでプロジェクトがある前提で、お伝えしていきます。
プロジェクト作成については、以下の記事の「プロジェクトの作成」の項目を参考にしてください。


Google Analytics APIの取得
上記のURLから、Google Cloud Platformのライブラリに移行して、Google Analytics API のアイコンを探します。(検索も可能です。)
APIの有効化
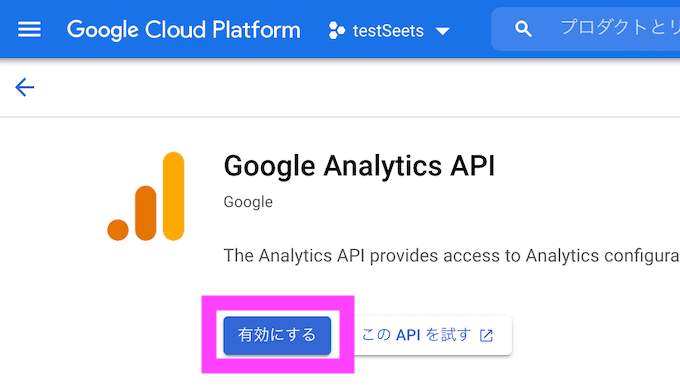
Google Analytics APIのページを見つけたら、Google Analytics APIを有効にします。

API 認証情報の作成
認証情報の作成
続いて、認証情報の作成の手順を解説していきます。
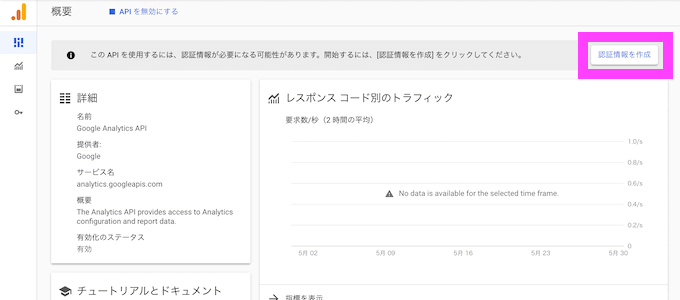
Google Analytics APIのページから、認証情報の作成をクリックします。

①認証情報の種類
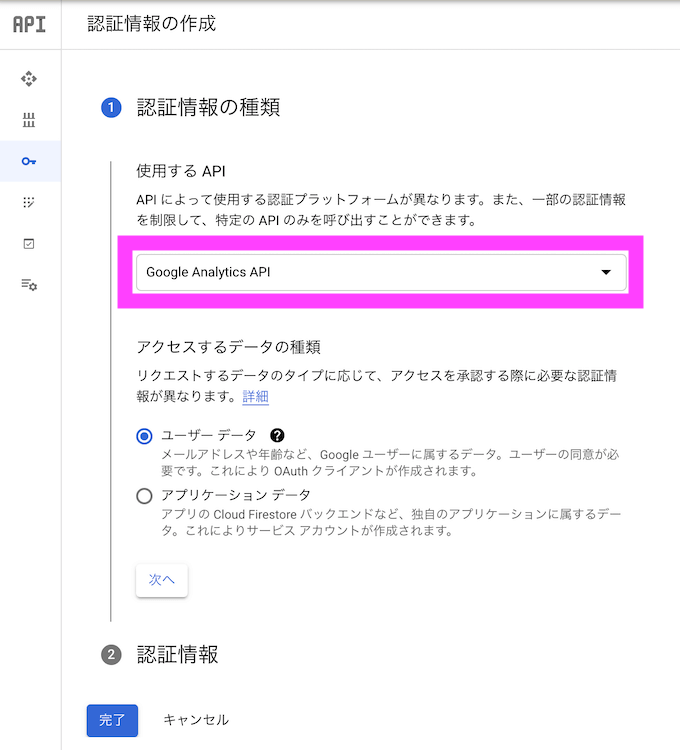
使用するAPIは、Google Analytics APIを選択します。
アクセスするデータの種類は、基本的には、ユーザーデータのままで問題ありません。

②OAuth同意画面
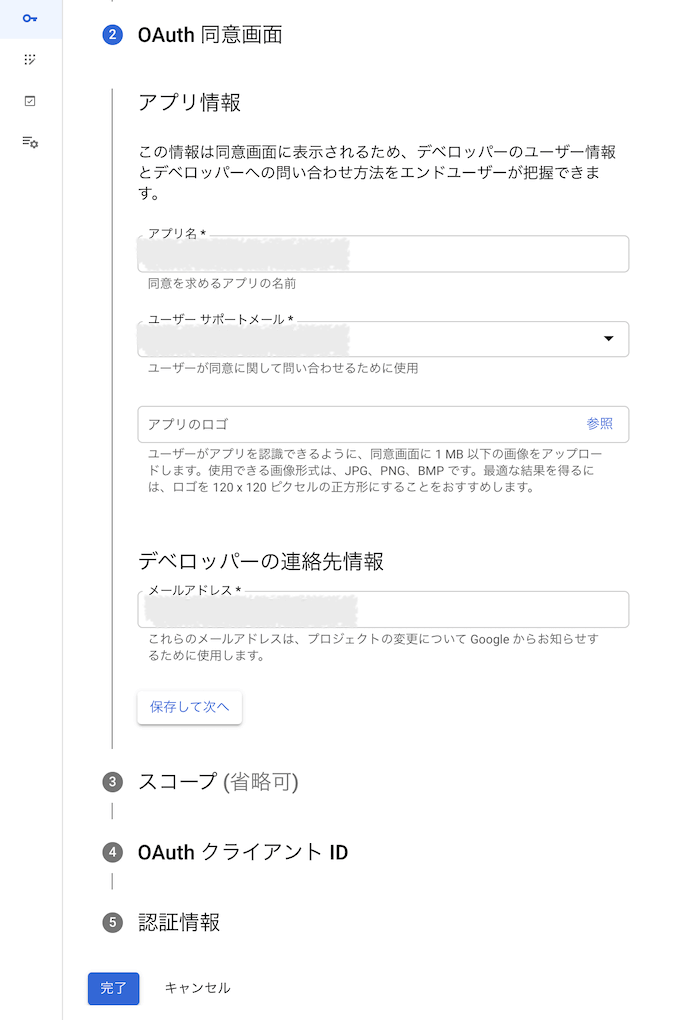
アプリ名は適当な名前で問題ありません。

③スコープ→省略
※ここは説明を省略。
④OAuthクライアントID
こちらの名称も適当で問題ありません。
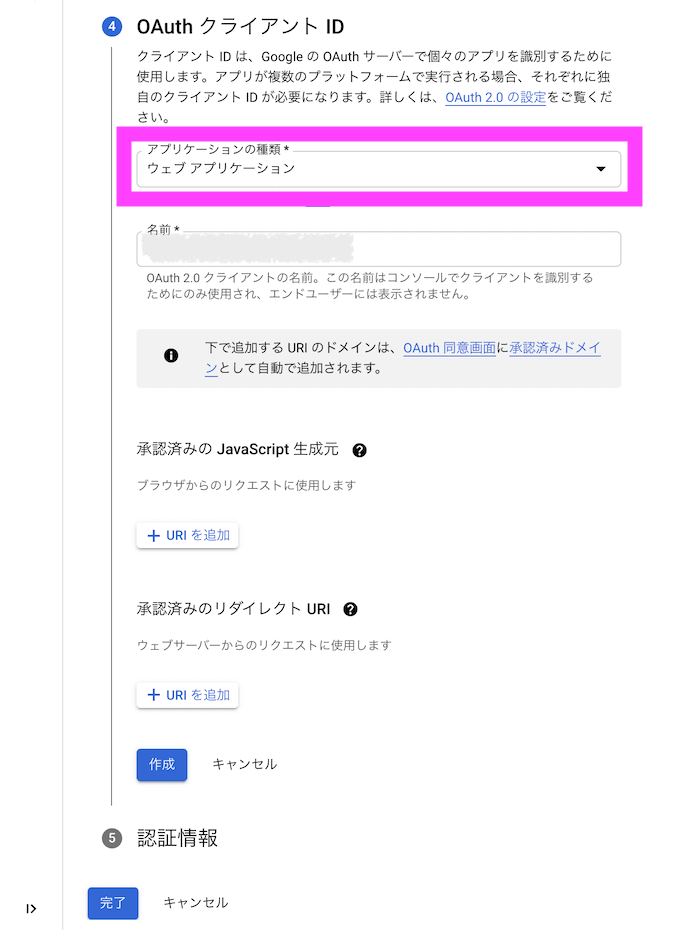

完了を押すと、jsonファイルが発行されますが、使うのは、次のサービスアカウントの作成で発行されるjsonファイルです。
サービスアカウントの作成
サービスアカウントの管理から、サービスアカウントの作成を進めます。
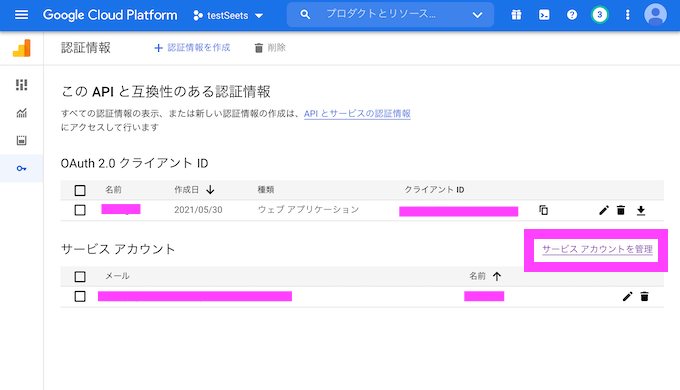

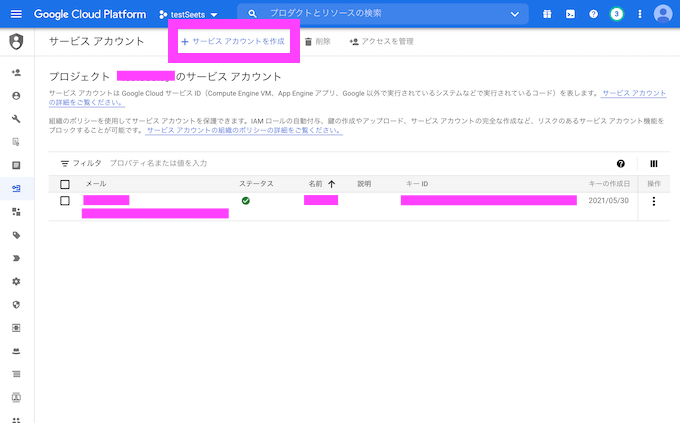

サービスアカウントの作成を進めていくと、
xxxxxxxxx@xxxxxxxxxxx.iam.gserviceaccount.com
のようなアドレスが発行されます。
ここで発行されたアドレスは、次のユーザー追加で使用します。
ちなみに、権限は今回は、編集者にしました。
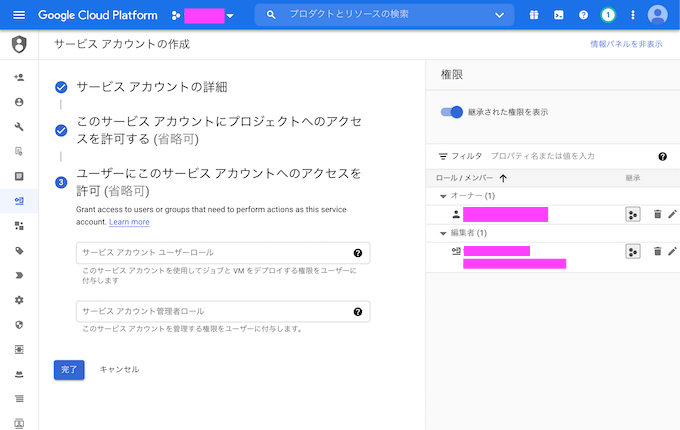

完了と同時に、jsonファイルが発行されます。
さきほどの認証情報で発行されたjsonファイルではなく、ここでダウンロードされるjsonファイルをGAの認証に使います。
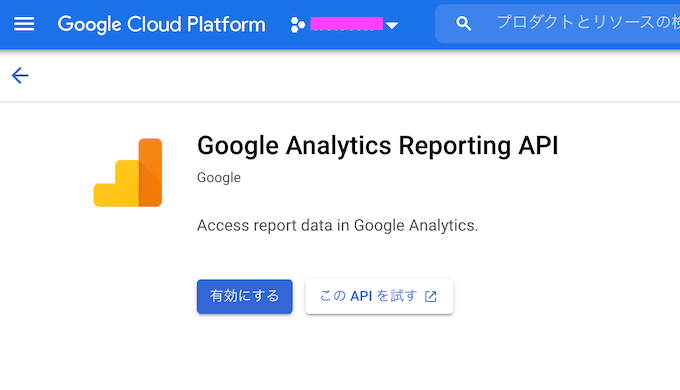
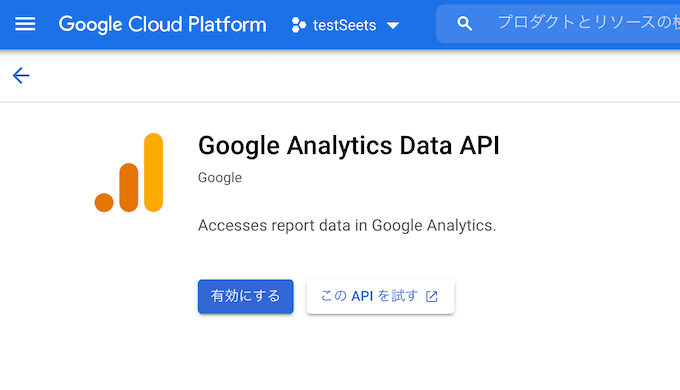
関連するAPIの有効
今回は、Google Analyticsに関係する2つのAPIも有効にしています。
(もしかしたら、不要かもしれませんが、念のため)


Google Analytics4のユーザー追加
続いて、Google Analytics4のユーザーを追加していきます。
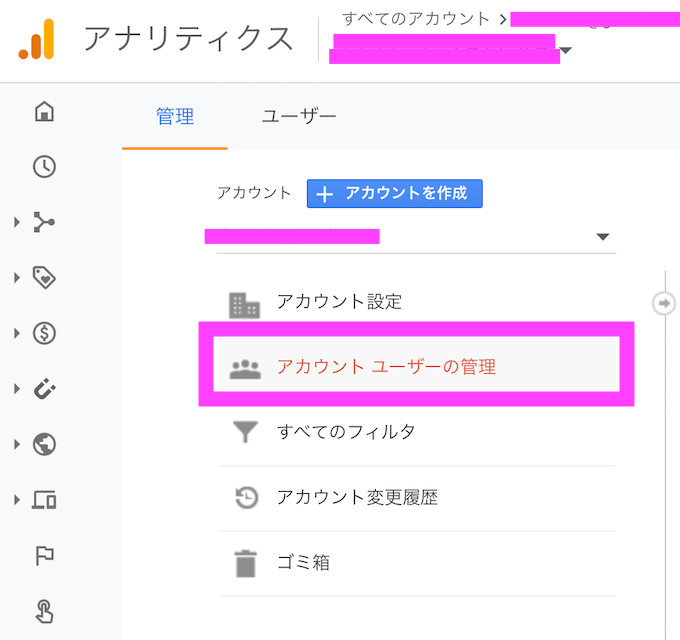
Google Analytics4を開いて、左のタブしたの歯車のマークを押すと、アカウントユーザーの管理がでてきます。

+ボタンがあるので、そこをクリックします。
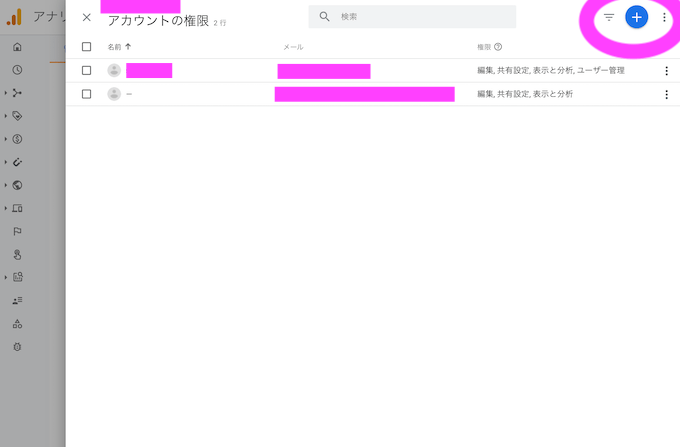

ここにさきほどサービスアカウントの作成で取得した
xxxxxxxxx@xxxxxxxxxxx.iam.gserviceaccount.com
のメールアドレスを入力して、追加を押します。
(権限は、今回は編集まで与えることにしましたが、表示と分析のみでも問題ないはずです。)
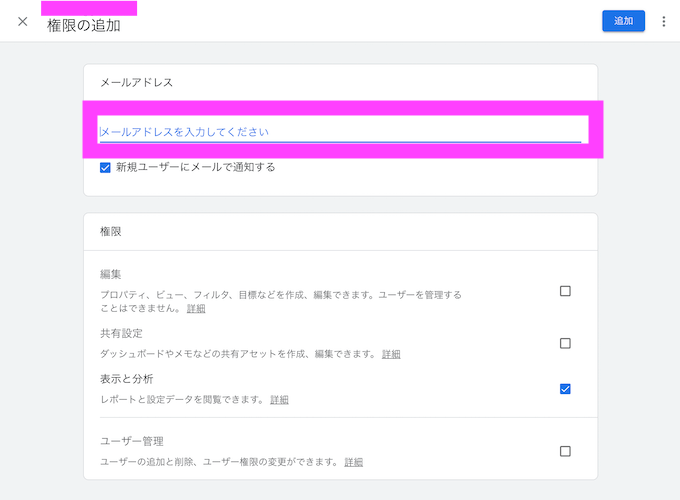

リストにユーザーが追加されているのを確認できたら、完成です。
スクリプトの準備
今回は、ga.pyという名前のpythonスクリプト、さきほどサービスアカウントの作成でダウンロードされたjsonファイルを使います。
jsonファイルは、creds_ga2.jsonと適当な名前に変更して上で、pythonスクリプトと同じファイルに入れています。


Poetryの準備
僕はpoetryを使っているので、今回は、以下の2つをインストールしました。
poetryを外せば、poetry環境以外でもpipコマンドとして使えるはずです。
poetry run pip install google-api-python-clientpoetry run pip install google-analytics-dataもしかしたら、google-analytics-data だけで問題ないかもしれませんが、確認できていないので、2つ記載しておきます。
スクリプトの記述
ここからは実際に、ga.pyのスクリプトサンプルです。
from google.analytics.data_v1beta import BetaAnalyticsDataClient
from google.analytics.data_v1beta.types import DateRange
from google.analytics.data_v1beta.types import Dimension
from google.analytics.data_v1beta.types import Metric
from google.analytics.data_v1beta.types import RunReportRequest
import os


os.environ['GOOGLE_APPLICATION_CREDENTIALS'] = 'creds_ga2.json'

def sample_run_report(property_id="xxxxxxxxxx"): #←プロパティID
    client = BetaAnalyticsDataClient()

    request = RunReportRequest(
        property=f"properties/{xxxxxxxxxx}",  #←プロパティID
        dimensions=[Dimension(name="city")],
        metrics=[Metric(name="activeUsers")],
        date_ranges=[DateRange(start_date="2021-05-28", end_date="today")],
    )
    response = client.run_report(request)

    print("Report result:")
    for row in response.rows:
        print(row.dimension_values[0].value, row.metric_values[0].value)

if __name__ == '__main__':
    sample_run_report()
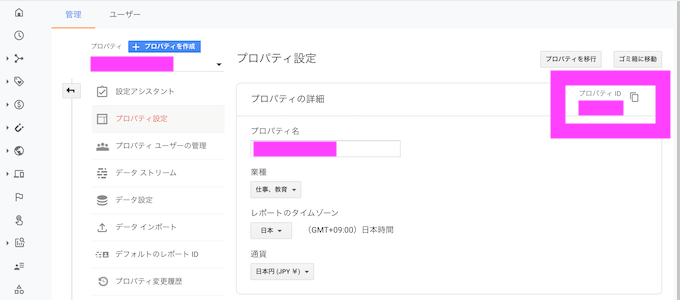
ポイントは、2箇所に、IDの記入する箇所がありますが、いずれもGoogle Analytics4のプロパティIDで問題ありません。
プロパティIDはGoogle Analytics4の歯車のマークからプロパティ設定を押すと確認ができます。

こちらの日付は、適宜、好きな日付に変更してみてください。
(今回は、3日日間のリージョンデータを取得します。)
date_ranges=[DateRange(start_date="2021-05-28", end_date="today")]これでサンプルコードは完成です。
Pythonの実行
実際にコードを動かしてみます。
無事に、レポートを取り出すことができました!
Report result:
Sapporo 3
(not set) 1
Itabashi City 1
Maibara 1
Nagaoka 1
Tomakomai 1
Tsukuba 1
まとめ
PythonでGoogle Analytics4のレポート情報を取得する方法をご紹介していきました。
繰り返しになりますが、今回は、Google Analytics4の情報で、それ以前のGAのバージョンには対応していませんので、注意してください。
定期的にGAのレポートを作成している場合は、これをスプレッドシートやエクセルと連携することで、かなりの作業工数の軽減に繋げられると思います。
関連記事


【参考記事】


コメント